Wednesday, October 1, 2025
Accessing Natas3 by using the password we found in the previous level, says that “There is nothing on this page”.
Soultion
We will check the page source to see the source code.
View-source:
<html>
<head>
<!– This stuff in the header has nothing to do with the level –>
<link rel=”stylesheet” type=”text/css” href=”http://natas.labs.overthewire.org/css/level.css”>
<link rel=”stylesheet” href=”http://natas.labs.overthewire.org/css/jquery-ui.css” />
<link rel=”stylesheet” href=”http://natas.labs.overthewire.org/css/wechall.css” />
<script src=”http://natas.labs.overthewire.org/js/jquery-1.9.1.js”></script>
<script src=”http://natas.labs.overthewire.org/js/jquery-ui.js”></script>
<script src=http://natas.labs.overthewire.org/js/wechall-data.js></script><script src=”http://natas.labs.overthewire.org/js/wechall.js”></script>
<script>var wechallinfo = { ”level”: ”natas3”, ”pass”: ”3gqisGdR0pjm6tpkDKdIWO2hSvchLeYH” };</script></head>
<body>
<h1>natas3</h1>
<div id=”content”>
There is nothing on this page
<!– No more information leaks!! Not even Google will find it this time… –>
</div>
</body></html>
Other that that text, we can see some text which is commented. And it says no more leaks, Not even Google will find it this time.
When it says “Not even Google”, it means that google search engine can’t find certain file or directories on this web page.
Before proceeding you need to understand how exactly search engine finds websites, rather the correct term is how it indexes a website or creates a sitemap. Every search engine has web crawlers set up which try to find everything they can access to on a website. Now, if a web server doesn’t have any controls in place that can avoid crawlers to access specific parts of a website, these crawlers will access everything and will get indexed for search engine optimization.
To avoid access to private areas of a website, web servers have a file called robots.txt which explicitly mentions which parts to avoid for these crawlers.
Now we know how a robot.txt file works, we can try to find this file on our natas3 webpage. Most obvious way is to fire a curl command
Command: curl http://natas3.natas.labs.overthewire.org/robots.txt -u natas3:3gqisGdR0pjm6tpkDKdIWO2hSvchLeYH
Output:
 ╰─λ curl http://natas3.natas.labs.overthewire.org/robots.txt -u natas3:3gqisGdR0pjm6tpkDKdIWO2hSvchLeYH
User-agent: *
Disallow: /s3cr3t/
And we found it! It was actually very easy to find robots file as it was not at all hidden on this web server. Generally this file will be hidden and won’t be accessible easily as it controls access.
As you can see in the output, that is how a robots.txt file looks like. It has a “Disallow” parameters where you can mention which pages/files on the website should not be accessed by any web crawlers.
In the “Disallow” parameter above we can there is a directory named “/s3cr3t/”. When we try to access that directory, we can find a user.txt file which has password stored for natas4.
Using the password we found for the natas2 in the previous level, we will access natas2 webpage.
The webpage clearly says that “There is nothing on this page”
Solution
Our obvious first step would be using curl or checking the view-source.
View-source:
<html>
<head>
<!– This stuff in the header has nothing to do with the level –>
<link rel=”stylesheet” type=”text/css” href=”http://natas.labs.overthewire.org/css/level.css”>
<link rel=”stylesheet” href=”http://natas.labs.overthewire.org/css/jquery-ui.css” />
<link rel=”stylesheet” href=”http://natas.labs.overthewire.org/css/wechall.css” />
<script src=”http://natas.labs.overthewire.org/js/jquery-1.9.1.js”></script>
<script src=”http://natas.labs.overthewire.org/js/jquery-ui.js”></script>
<script src=http://natas.labs.overthewire.org/js/wechall-data.js></script><script src=”http://natas.labs.overthewire.org/js/wechall.js”></script>
<script>var wechallinfo = { ”level”: ”natas2”, ”pass”: ”TguMNxKo1DSa1tujBLuZJnDUlCcUAPlI” };</script></head>
<body>
<h1>natas2</h1>
<div id=”content”>
There is nothing on this page

<img src=”files/pixel.png”>

</div>
</body></html>
There we can an image being rendered on webpage using img tag.
This “pixel.img” image file is stored files directory and is being showed on the main webpage. Although we can’t see any image on the webpage, it is still there. Infact it is a single pixel in image format. But its not important which image, rather it tells us that we can try directory traversal on this page as we already know the directory “files” can have more files other than just images.
So we will just try to explore that directory first.
http://natas2.natas.labs.overthewire.org/files/
and Voilà, we have that image file (pixel.img) and another text file (users.txt) in “files” directory.
And the password is stored in that users.txt file.
Contents of users.txt
# username:password
alice:BYNdCesZqW
bob:jw2ueICLvT
charlie:G5vCxkVV3m
natas3:3gqisGdR0pjm6tpkDKdIWO2hSvchLeYH
eve:zo4mJWyNj2
mallory:9urtcpzBmH
Once you access Natas Level 1 using the password we found in natas0, you will see the text on the webpage that says “You can find the password for the next level on this page, but rightclicking has been blocked!”
Solution
Lucky for us we already know a method which we used in last level i.e to use curl command in Linux to retrieve content from a URL and display it in the terminal. When you fire curl in terminal we will get an output and the password in the source code too!
command: curl http://natas1.natas.labs.overthewire.org -u natas1:0nzCigAq7t2iALyvU9xcHlYN4MlkIwlq
Output:

<html>
<head>
<!– This stuff in the header has nothing to do with the level –>
<link rel=”stylesheet” type=”text/css” href=”http://natas.labs.overthewire.org/css/level.css”>
<link rel=”stylesheet” href=”http://natas.labs.overthewire.org/css/jquery-ui.css” />
<link rel=”stylesheet” href=”http://natas.labs.overthewire.org/css/wechall.css” />
<script src=”http://natas.labs.overthewire.org/js/jquery-1.9.1.js”></script>
<script src=”http://natas.labs.overthewire.org/js/jquery-ui.js”></script>
<script src=http://natas.labs.overthewire.org/js/wechall-data.js></script><script src=”http://natas.labs.overthewire.org/js/wechall.js”></script>
<script>var wechallinfo = { ”level”: ”natas1”, ”pass”: ”0nzCigAq7t2iALyvU9xcHlYN4MlkIwlq” };</script></head>
<body oncontextmenu=”javascript:alert(’right clicking has been blocked!’);return false;”>
<h1>natas1</h1>
<div id=”content”>
You can find the password for the
next level on this page, but rightclicking has been blocked!

<!–The password for natas2 is TguMNxKo1DSa1tujBLuZJnDUlCcUAPlI –>
</div>
</body>
</html>
And that’s the password for the Natas Level 2.
Natas Wargames from OverTheWire teaches basic Serverside Web-Security. This is a good practice if you are into Bug Bounty Hunting.
I highly suggest that you create an account on WeChall to save your Natas Score. So if you ever want to comeback to a specific level you can!
From Natas Web Page:
Each level of natas consists of its own website located at http://natasX.natas.labs.overthewire.org, where X is the level number. There is no SSH login. To access a level, enter the username for that level (e.g. natas0 for level 0) and its password.
Each level has access to the password of the next level. Your job is to somehow obtain that next password and level up. All passwords are also stored in /etc/natas_webpass/. E.g. the password for natas5 is stored in the file /etc/natas_webpass/natas5 and only readable by natas4 and natas5.
Start here:
Username: natas0
Password: natas0
URL: http://natas0.natas.labs.overthewire.org
Solution
Once you access the webpage, you will see a text saying “You can find the password for the next level on this page.”
This means the password should be here in the source code of this page. You can solve this by two methods.
- Using Browser’s Developer Tools:
Right click on the page and select “View Page Source”
This will give you the HTML Code for the page.
<html>
<head>
<!– This stuff in the header has nothing to do with the level –>
<link rel=”stylesheet” type=”text/css” href=”http://natas.labs.overthewire.org/css/level.css”>
<link rel=”stylesheet” href=”http://natas.labs.overthewire.org/css/jquery-ui.css” />
<link rel=”stylesheet” href=”http://natas.labs.overthewire.org/css/wechall.css” />
<script src=”http://natas.labs.overthewire.org/js/jquery-1.9.1.js”></script>
<script src=”http://natas.labs.overthewire.org/js/jquery-ui.js”></script>
<script src=http://natas.labs.overthewire.org/js/wechall-data.js></script><script src=”http://natas.labs.overthewire.org/js/wechall.js”></script>
<script>var wechallinfo = { ”level”: ”natas0”, ”pass”: ”natas0” };</script></head>
<body>
<h1>natas0</h1>
<div id=”content”>
You can find the password for the next level on this page.

<!–The password for natas1 is 0nzCigAq7t2iALyvU9xcHlYN4MlkIwlq –>
</div>
</body>
</html>
The password is right there in commented text in content division.
- By using curl command on terminal:
Use curl utility to get the same output but on terminal.
Command: curl http://natas0.natas.labs.overthewire.org -u natas0:natas0
flag -u is for username and password in a specific format - username:password
And that is how you clear Natas Level 0 and get the password to access Natas Level 1
Tuesday, September 23, 2025
Hi there! In this multi-blog series, you will learn how to build a fully functioning and usable SOC using all open-source tools. I started working on this project because I wanted to learn SIEM. But how can anyone learn a SIEM tool without getting logs from endpoints and simulate different types of attacks on those endpoints to analyze attack scenarios.
So I decided not to just a learn a single SIEM but to build a whole SOC environment which would have a SIEM, EDR, XDR, Endpoints, Firewall, Case Management Solution, Threat Intelligence Platform and finally an Attacker Machine.
In this part, we will gather all the ISOs and Docker Containers for Client VMs, SIEM Tool, IR/Case management tool, Firewall. Below are the web links that you can use. Download everything and get ready to start setting up the Lab.
For Agents/Client Machines:
- Windows 10 Pro ISO : https://www.microsof … ownload/windows10ISO
- Ubuntu Desktop (you can use either LTS or Latest Rolling): https://ubuntu.com/download/desktop
Firewall
- OPNSense Firewall: https://opnsense.org/download/
SIEM
- Wazuh Docker Deployment: https://documentatio … l#deployment-options
Incident Response and Case Management Platform
- DFIR-IRIS Docker Deployment: https://docs.dfir-ir … est/getting_started/
Setting up a Lab
In order to build a SOC we will need an environment where we can configure and play with different tools. Its better to keep something like this isolated on Virtual Machines or on Docker Containers so that they won’t mess with our primary host. To create a lab for this purpose I would suggest to invest in a powerful workstation (only if it is easily possible. I know its expensive). As I can’t afford to build a workstation now I am using my primary laptop. On it, I am using Virtualbox for all the virtual machines we need (for endpoints, firewalls) and I will be running docker containers for SIEM other tools on my host system. I know what I said earlier that we should keep this isolated from our host. But I simply don’t have enough RAM to fire up more than 5 Virtual Machines on Virtual Box at the same time.
My System Specifications (Minimum Requirements)
- RAM: 16 GB DDR5 4800 Mhz
- Storage: 512 GB
- CPU: 12th Gen Intel(R) Core(TM) i7–12700H (20) @ 4.7z
- GPU: GeForce RTX 3050 Ti Mobile
- Host OS: Garuda Linux (Arch Based)
- Virtualization Software: VirutalBox
Virtual Machines we need:
- First, create 2 VMs; a Windows 10 Pro and an Ubuntu Desktop. Now both these VMs will require at least 2 GBs RAM & 25 GBs Disk Space each to work properly
- Now, create 2 more VMs for a Master Firewall and a Backup Firewall (These will work using pfsync protocol to create a High Availability Setup. We will set up that up in next parts). Install OPNsense Firewalls in them
Network Setup:
This is the confusing part, I suggest you read every word carefully and don’t rush❗
VirtualBox Network Settings:
- First, Open Virtualbox and go to it’s Network Settings.
- Under “Host-only Networks” if there is not a default network created by virtualbox, create one!
- If a network exists, then check its IP settings. There must be a DHCP Server enabled which will automatically assign IP addresses to VMs. (For e.g. Network Gateway: 192.168.56.0 and DHCP Server Address: 192.168.0.100)
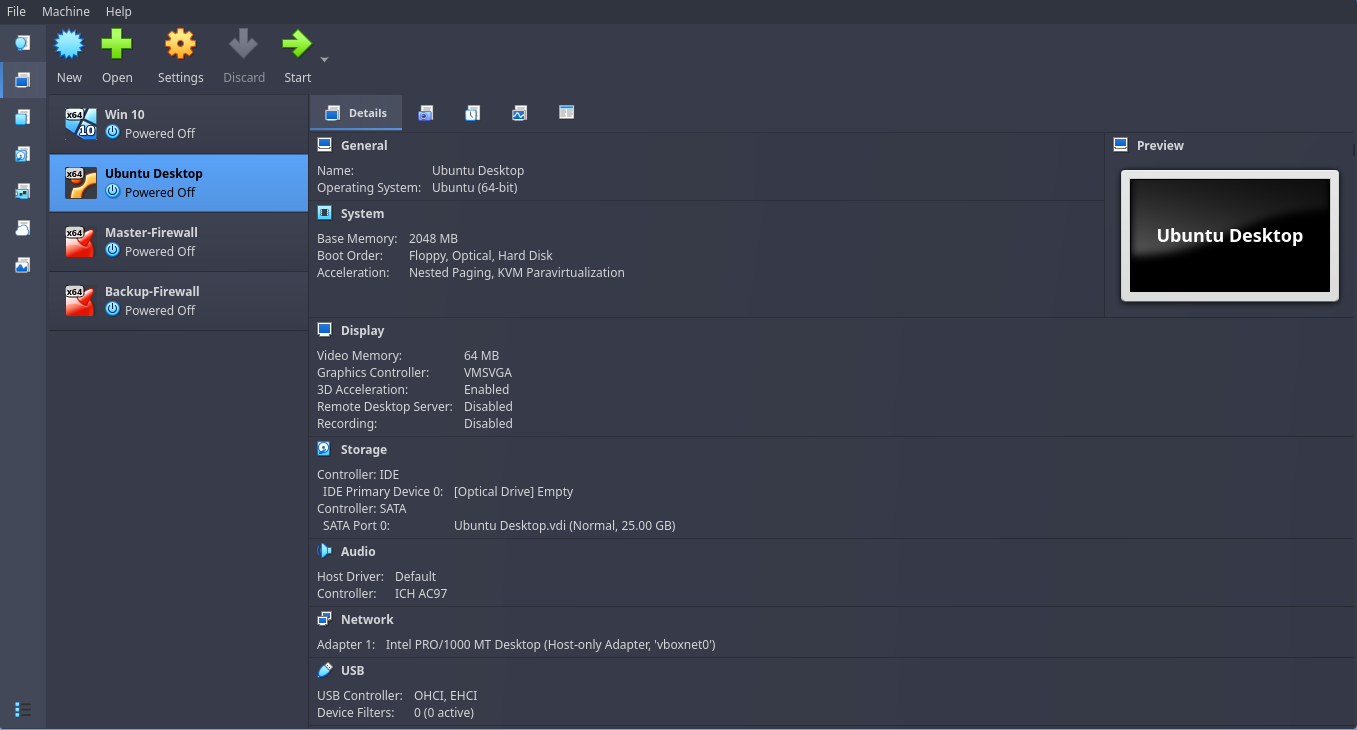
For Windows 10 Pro and Ubuntu Client Machines:
Go to VM Settings then Network settings. Here, under Adapter 1 click on Enable Network Adapter. Then, For “Attached to” drop-down menu, select Host-Only Adapter.
The reason why I am using a single adapter with Host-only adapter settings here is because I will be using my host machine for SIEM and Incident Response/Case Management tools. So, these VM’s should be able to talk (send logs data) to my host machine.
If you want to check if the VBox config is right or not, then check these screenshots below to verify if you have set it up correctly or not.
For Wazuh and DFIR-IRIS
To install Wazuh and DFIR as Docker Single Compose Stacks, simply follow their official documentation which I have given above in the web links. It is really easy! There will be no network setup needed as we will be using our Host Machine for both these services. Only DFIR-IRIS will require a different port to run on for its web interface. It will probably spit out an error while firing up the docker containers that the default 443 port is being used by a different service which makes sense because Wazuh Dashboard uses 443 by default.
So to change the default port for IRIS:
- Go to DFIR-IRIS Directory and edit docker-compose.base.yml file
- Find ports section, remove default line and instead write:
ports:
 - 8443:443
This will map the Port 8443 to 443. Then save the file and restart docker containers. Now IRIS should work fine on Port 8443.
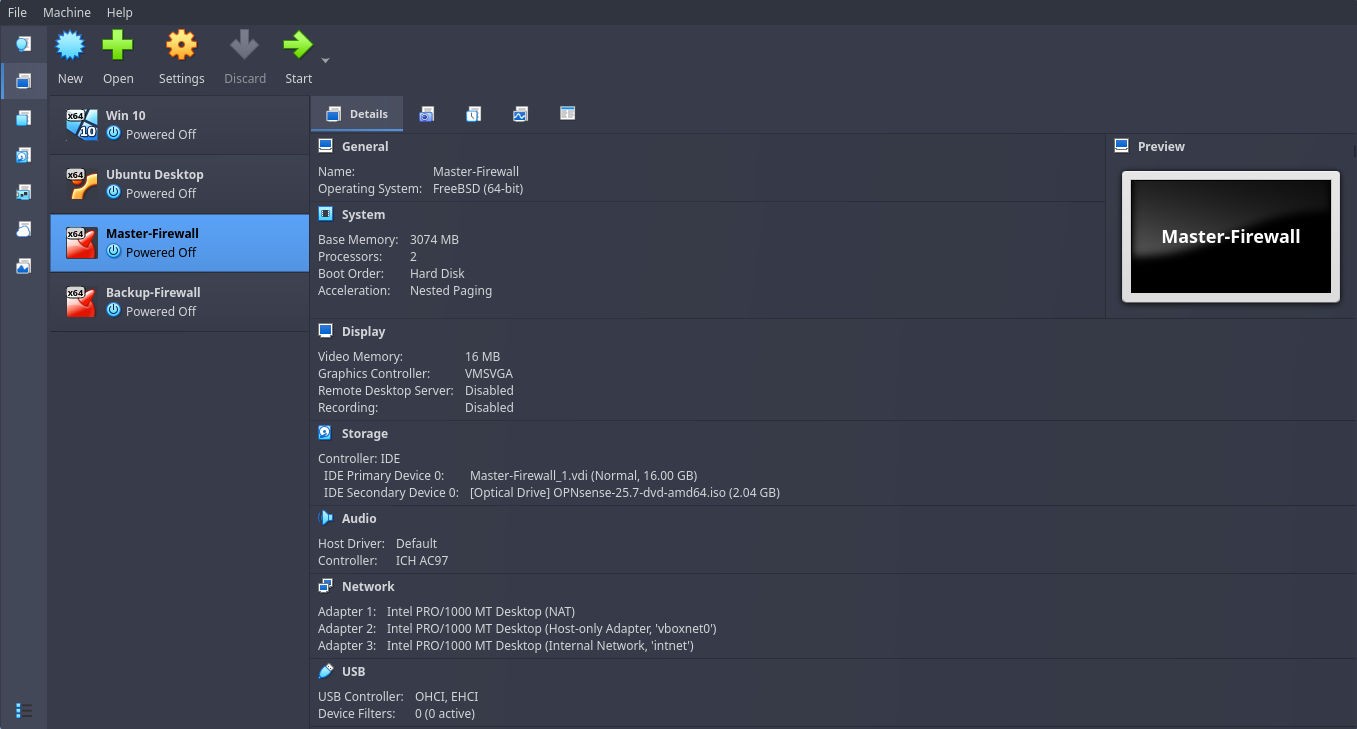
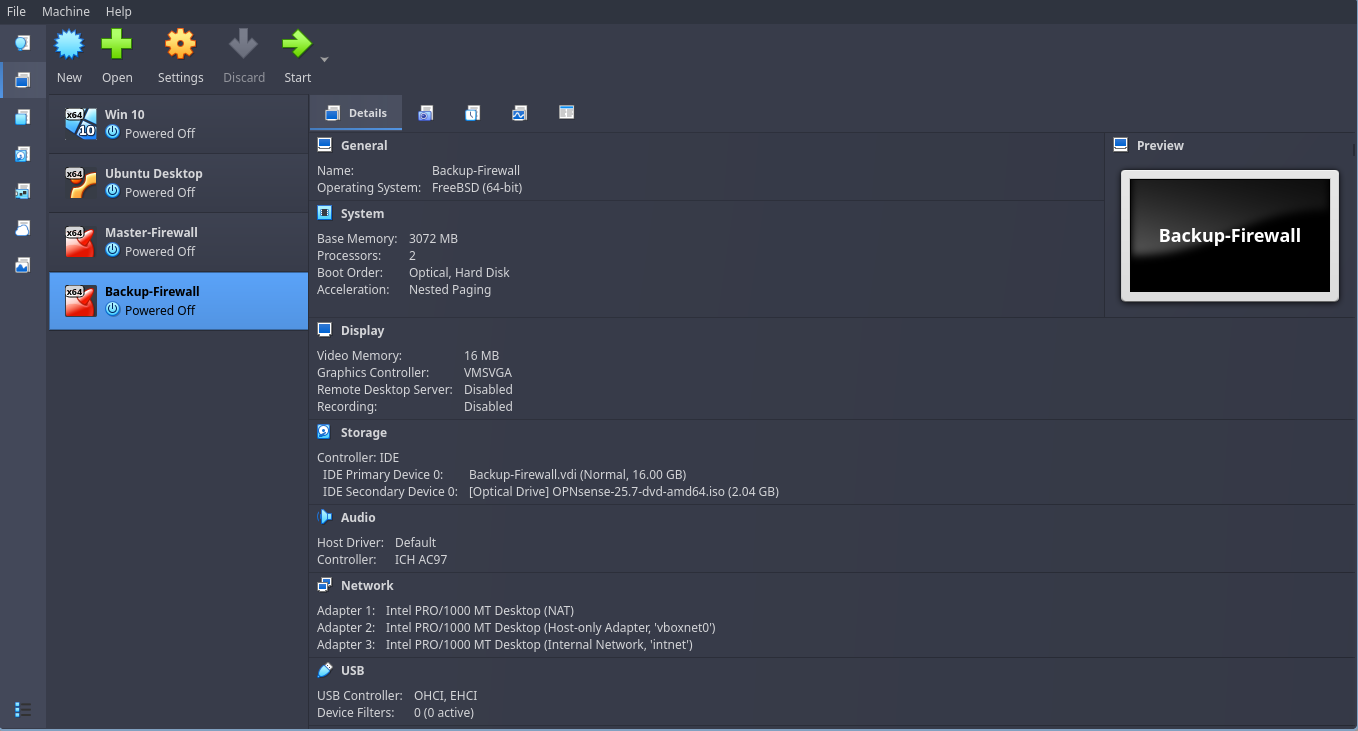
OPNsense Firewalls Network Adapter Settings
Now, both the Master and Backup Firewalls will require 3 Network Adapters.
- Adapter 1 : NAT Mode (This adapter is for WAN, so that our Client VMs can connect to the network through Firewall)
- Adapter 2 : Host-Only Adapter (This is for LAN. We will give a static IP to the firewall where we can also handle firewall settings using its web interface)
- Adapter 3 : Internal Network (This is for High Availability Setup, basically to sync with the other firewall)
This is how Vbox settings page looks like for both Firewalls.
————————————————————————————————————————————————————————-
That’s it for this part!
In the next part we will go over
- Firewall Setup, Custom Rules
- Network Connectivity Test
- Wazuh Agent Installation & Integration to Wazuh Server
- MISP Setup (Tool for Threat Intelligence)
Till then, Cheers!☕